Posted on Leave a comment

Can-Am Spyder Red Bellerdine Graphics kit, BRP, Spyder Wrap

Special thanks to our customer for sending us his photos of his Spyder with our new Red Bellerdine kit applied.  Mark made a request to us for the look he wanted for his Spyder. We created, designed and delivered.  If you have a custom request for graphics for your motorcycle or Can-Am spyder feel free to contact usSee our full line of Can-am Spyder products here. Shop for wraps on our website.

814-838-6377

The Bellerdine spider can be applied in many different ways so have fun and express yourself.
Bellerdine Spider Red-Black
Bellerdine Spider Red-Black Is a great accent to promote your Spyder motorcycle. Order your kit today!
Bellerdine Spider in Black- red combo
Get noticed with our most popular spider design we offer. You receive 3 pieces in your kit
Posted on Leave a comment

Can-Am Spyder Carbon Punch Purple graphics kit

This Carbon Punch Purple Spyder RS graphics kit was custom designed for our customer Paul. He wanted something Purple to match his LED lights that were already mounted on his Spyder.

This is a result per his request.. we added our Mechanical Spider to his trunk and tail and edited the color so it also had a Purple hue to it.  This kit is now available in just a frunk wrap or our kit as it appears here.  We have products for the: RT, RS, RSS & GS models.

Our Can am Spyder web site selection continues to grow each and every day. Shop our HUGE website to see all of our wrap patterns available.

Paul Said:  Thanks again for everything! You guys are awesome!   EVERYONE is stopping on the road and staring, yelling at me, etc…

Carbon Punch Purple

Posted on 1 Comment

Can Am Spyder Graphics Kit

We created this custom graphics kit for one of our customers located in Germany.  She is a big fan and wanted to represent over seas.  If you noticed we did not use any copy righted logos these are all general art images created to look like the team art.  This really satisfied our customer & she loved the look.  If you have a custom design request please send it in and we will see what we can create for you. Shop our huge wrap selection or see our Can am Spyder Frunk or pre cut wrap kits here online.


Electro Blue RT Reflective graphics kit at night
Dress up your Spyder with our Electro graphics kit in reflective option. Reflective material will illuminate when light hits it at night.
Cosmos Orange tone Spyder ST
Front view of this beautiful BRP Can-am Spyder ST with our Cosmos Orange tone graphics kit applied.
Barbwire 101 gold is a classy looking kit
Dress up your Lava Bronze Spyder with our Gold tone Barbwire 101 Graphics kit. Available in reflective too.
Posted on Leave a comment

Can-am Spyder custom advertising, Spyder lettering, Promotional graphics for Can-am Spyders

Do you need advertising for your  BRP Can-am Spyder?  We can help… This example was for one of our local Can-am dealers who will be using this Spyder for promotional use around our local area.  They were looking for something eye catching that tied into the colors of their existing logo.  They also asked that we incorporate some Advertising info off of BRP’s wesite regarding purchase of a Spyder along with website & other important information.  If you have a Spyder & are looking to do some advertising on it, contact us we can assist.  Our pre-cut frunk kits make this project easy to apply for most of our out of state customers or you can send us your parts & we can apply the graphics & send the pats back to you.  Let us know how we can assist…

Posted on Leave a comment

Can-am “Spyder Teeth” decal kit

This is a simple “how to” for the application of our “Spyder Teeth” decal kit for the front of a Can-am Spyder.

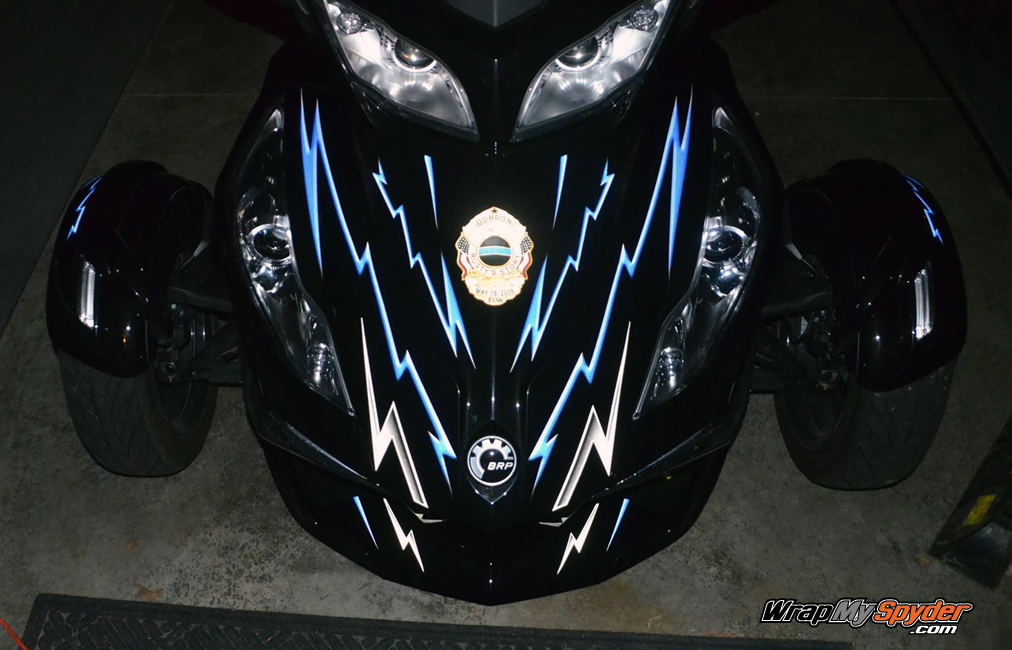
This is a little step-by-step on how to apply the Wrapmyspyder.com shark teeth to the Spyder RS. I picked design style #817 because I like the tongue design best. The normal two sizes available won’t work for the spoiler, so I had Pete print the design at 6″ x 20″, then I trimmed the red border from around the teeth, that puts it at just the right height for the application.

The leading edge of the two halves is curved and would leave the installation with bucked teeth <smile>, so I trimmed the front edge back, in a straight line from the front edge of the top tooth to the front edge of the bottom tooth. You could just leave one and then trim the second piece so there is an overlap, but I trimmed both pieces in my installation.

With all the trimming done, prep the spoiler by thoroughly cleaning the spoiler area, and wiping it down with 70% rubbing alcohol & standard paper towel off the roll, as recommended by Wrapmyspyder.com. Have your cotton gloves (add on at check out) , squeegee and blow dryer/heat gun at the ready.

Trim about 2″ of the backing off the leading edge. Placement of the first piece is critical because it determines how straight the teeth will be, you don’t want a crooked smile after all. So, don’t be afraid to remove and reapply until you get it completely straight. Of course, you are going to start from the center of the spoiler, and work your way around. There are a few contours to work around, so use your squeegee and gloves and remove the backing as you go. If you need to pull it back and reapply, do it, use the backing as necessary.

Take your time and get it on right, after that, the application of the second piece is a breeze. The teeth will overlap onto the small trim pieces where the spoiler ends. I applied it straight across and then sliced it to allow them to separate. After you’ve completed the installation, remember to heat the shark teeth up with your blow dryer / heat gun to activate the adhesive for permanent bond.

Order the  “Spyder Teeth” here.     See our full line of Can-am products here.

Phone: 814-838-6377